Welcome to Memorial Director, a web-based funeral home program that allows even the smallest, independent funeral home to become an efficient, service-oriented, competitive operation. With Memorial Director, funeral home operations will be streamlined and ultimately save the business time and money that can be better spent elsewhere.
Quick Access
One of the biggest benefits of Memorial Director is the ease of retrieving customer information no matter where you are located. As long as you have an internet signal, funeral home personnel may access and edit customer files from anywhere through the web-based program.
From the point of receiving the “first call” of a decedent to submitting of an obituary or death certificate, Memorial Director provides quick accessibility.
We all know how it is to be traveling on the road to file a death certificate or eating dinner when a customer or clergy member calls wanting information on a decedent. Unfortunately, with multiple death cases, it isn’t always easy to remember all the details of each case, thus, why Memorial Director is such a great asset. Funeral home personnel only have to access Memorial Director via a cell phone, tablet or computer, and the decedent’s information is immediately available to answer questions.
There are also those times when funeral home personnel have “down time” during a visitation at the funeral home or church, but don’t have access to the desktop computer at the main funeral home location. No problem. From a cell phone, tablet or laptop computer, funeral home personnel can continue to be productive by accessing Memorial Director from where they sit. They can immediately answer questions for the medical examiner, newspaper, county clerk or the like. If there is a change or error on a memorial card, the changes can be made instantly in Memorial Director and printed with the corrections to any wireless printer with no hassle.
Memorial Director’s web-based program also allows access to client forms and paperwork from any location; thus, funeral home personnel can obtain approvals and signatures in a parking lot, house or hospital room without shuffling papers or adding travel time to the company clock to obtain proper authorization.
Simple Set-Up
Memorial Director’s web-based funeral program can be simply set-up and personalized to meet the needs of any funeral home.
Firstly, because it is a web-based program, the need to have the latest and greatest technology and memory space on your computer system is non-existent. There are no daunting installation requirements or procedures to follow to actually use the program immediately.
Secondly, the only thing a funeral home needs to do, which should take less than a day’s work, is to “personalize” Memorial Director to reflect the company’s image and inventory.
Don’t worry, though, personalizing the program to business’ needs and adding inventory is a task even the most-challenged computer user can accomplish without a Computer Science Degree.
STEP 1: Adding Users
On the upper right hand corner of the Home page of Memorial Director, the user will see a “wrench” tool. Choose this option by placing the cursor on the tool and clicking. It will bring up a control panel, and a new screen will pop up (See below) giving the user the option to add users and/or administrators who can update, edit and input data into Memorial Director.
![]()
![]()
Choose Create new user to add information that will allow key personnel access to Memorial Director.

Once the information is entered, choose submit, and the information will be saved. User information may be changed and/or updated at anytime by accessing the control panel.
STEP 2: Designing Home Page
Access the control panel on the upper right hand corner of the Home page, where you see a small tool icon.
![]()
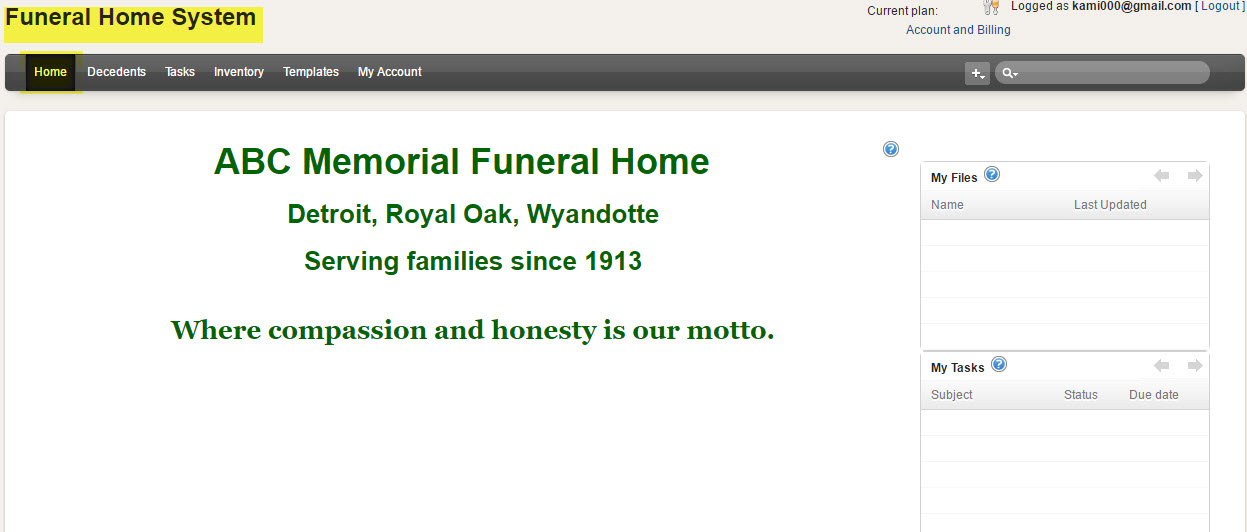
The user will see several tab options at the top of the screen (See image below) that can be used to “personalize” Memorial Director to meet the business’ needs. One of the first things an administrator will want to do is “personalize” the Home Page, so the business name, logo, or the like appear when logging into the program.
![]()
The beauty of Memorial Director is that the administrator can design the Home Page to their liking with the ease of Word commands and options. (See below)
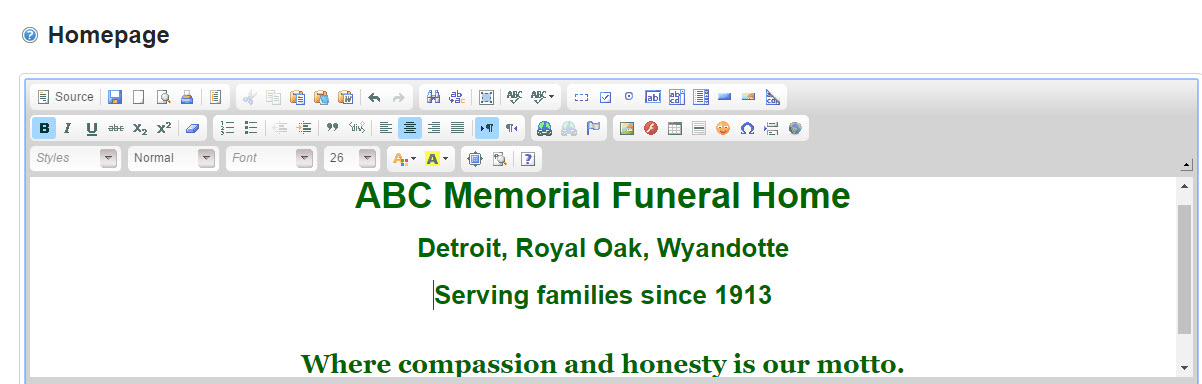
Once the administrator has designed the Home Page to their liking, choose submit to save the changes. The next time the Memorial Director is accessed, the Home Page will reflect the changes. (See below)
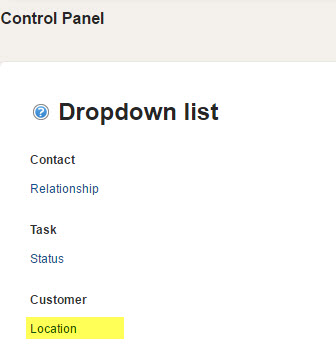
STEP 3: Personalizing Drop Down menus
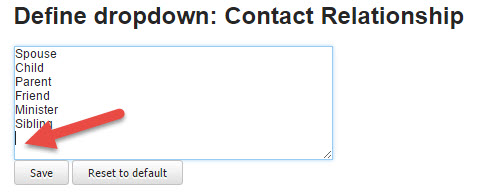
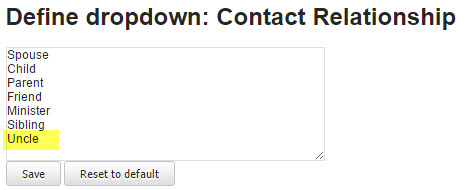
From the control panel there is a Drop Downs option, which allows the user/administrator to personalize drop down menus throughout Memorial Director to suit the business’ needs. When you click on the Drop Downs tab, the user will be taken to a screen where these changes may be inputted, accordingly. For instance, the first choice is contact. By clicking on contact, the user will see a list of possible relationships to the deceased.

The user may now add other relationships that are predominantly used in the business. The user may quickly add other relationship statuses by placing the cursor in the relationship box and inputting new titles and then saving changes. (See below images)
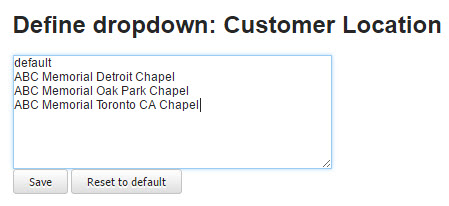
On the initial Drop Down screen, the user will also see a Customer option in the Drop Down List. This is where the business location(s) may be entered; facilities most commonly used for services; most commonly used churches, newspapers, etc. For the sake of ease, let’s start with entering the user’s business locations into the system; thus, the information will be pre-populated in Drop Down fields, eliminating the need to type the location out every time you have a new customer.
So, from the Drop Down List, choose Customer and then Location. (See image, below left) A new screen will appear with an empty box. It is in the empty box field that the user will input the funeral homes’ locations and then save to Memorial Director.
The user may continue to personalize specific fields using the Drop Down List and editing each area for the program.
STEP 4: Adding logo
To add a business logo to various documents in the web program, the process is as easy as scanning and emailing the electronic file to Memorial Director at: success@memorialdirector.com. Memorial Director will take care of the rest of the details to get your logo on all the templates needed in the program.
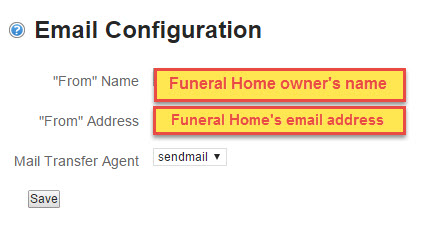
STEP 5: Configuring Email
One of the most important items to address in Memorial Director is adding the business email and contact information. To accomplish this task, from the Control Panel, choose the Email Configuration tab at the top of the page and enter the appropriate email information. After the information is entered, choose save.
STEP 6: Inventory ease
Inventory can be one of the most time-consuming processes a business contends with each year. Price changes and freight and shipping fees can constantly change. With Memorial Director, funeral personnel can make merchandise price changes quickly with only a few taps. The ability to immediately implement price changes avoids revenue loss for the business caused, many times, by the lack of time personnel have to update price books and/or price placards.
Memorial Director also eliminates the chance of calculation errors on customer statements, as merchandise prices in the computer are automatically calculated, including tax, when added to the customer’s statement. Thus, personnel can now throw out the hand calculators. Discounts may also be easily entered into Memorial Director, which, again, automatically calculates prices, payments, discounts and customer balance.
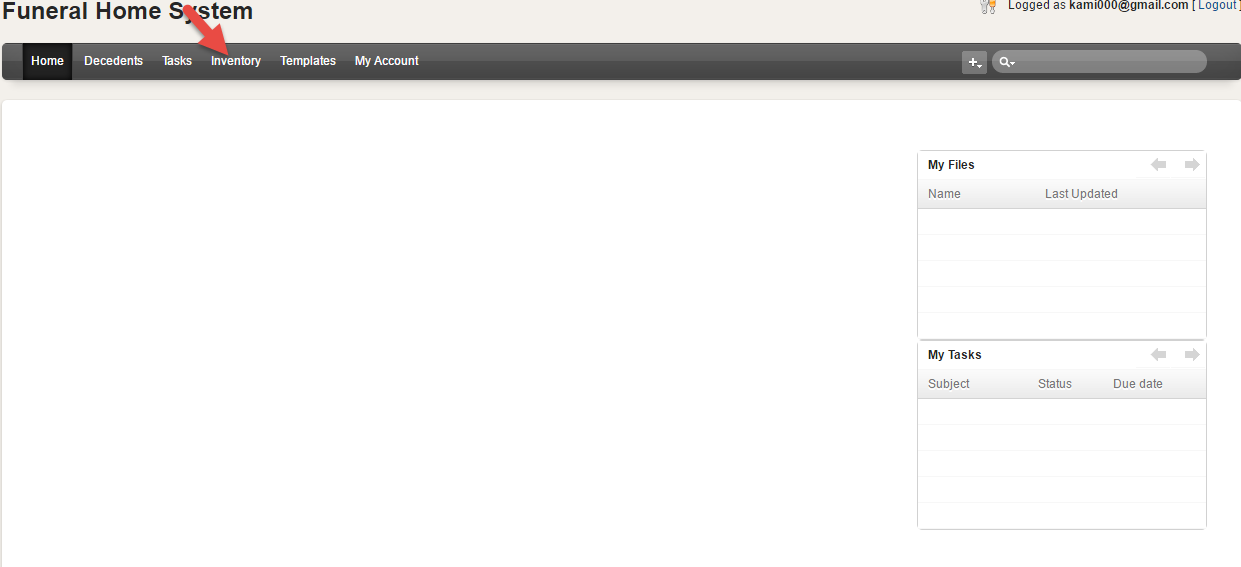
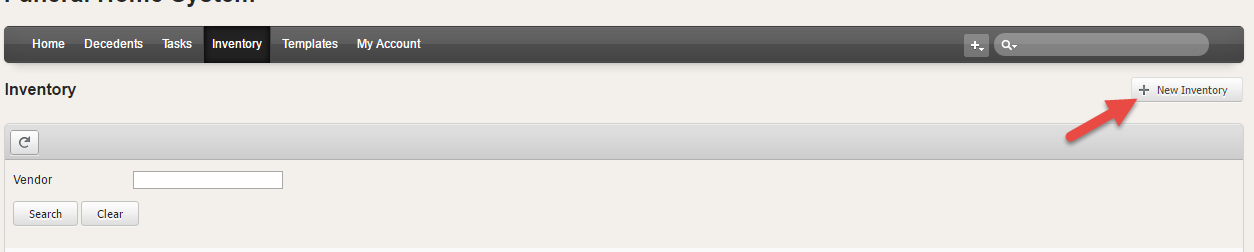
The first step in adding inventory to Memorial Director is to choose the Inventory Tab at the top of the Home Page.
Now the easy part begins as long as you have your inventory and prices in front of you. Choose the New Inventory tab on the upper right hand corner of the page.
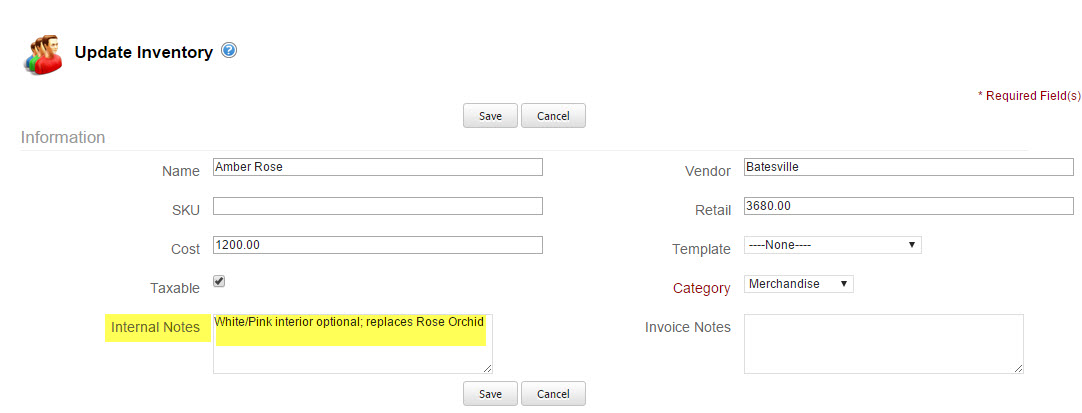
Once New Inventory is chosen, the next step is to enter the data of the merchandise, starting with the name of the item, vendor, retail cost and wholesale cost. There is also a box to check if the item is taxable or not. The category tab should be used to distinguish between merchandise, services and cash advance items, all of which are necessary for tax purposes. Once the item is assigned, the user may enter any internal notes needed for a specific item. For example, internal notes may be that a particular item is a special order item or that the interior of a certain casket comes in multiple colors. See the image below.
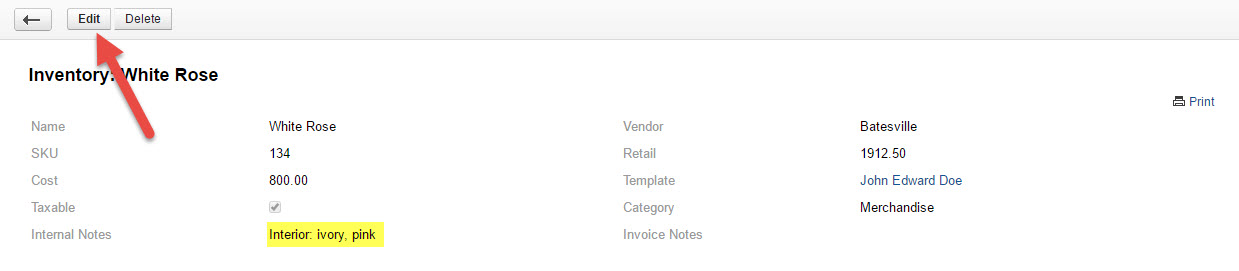
Once the data is entered, choose the save button and continue the process. A new screen will appear showing the inputted data. Let’s say, however, that after entering a specific item into inventory that the user notices a change is needed to a specific item description because, for example, the White Rose casket no longer comes with a pink interior. No problems. Edits are easy.
Just choose the edit tab on the upper left hand corner of the item (See below) on the inventory page and then change the data that was entered incorrectly. Make sure the item is saved after appropriate changes have been completed.
The next step is to, again, choose the Inventory tab and repeat the above steps until all of the merchandise has been added to Memorial Director.
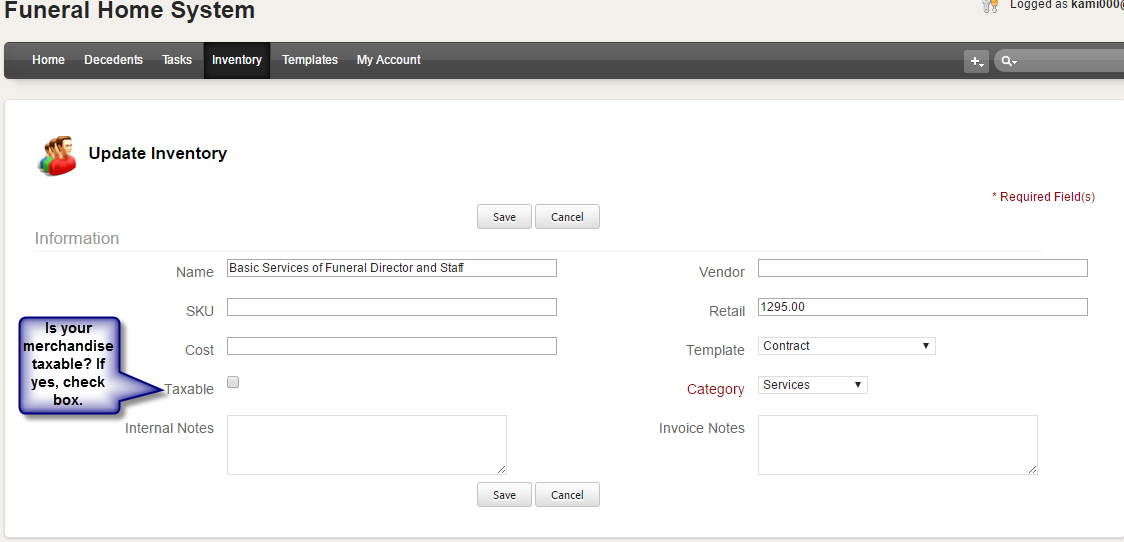
The process is the same for adding services and cash advance descriptions, except in most cases the taxable box (See below) on the template will not be chosen, unless a special taxable item was ordered for the family and it is not in the normal funeral home inventory. The user has the option to add at anytime any specially ordered items to the inventory, and it may be a good practice to do so, because in many cases, once one family member sees a particularly unusual item, others tend to want to order it, too. Either way, make sure the taxable box is marked appropriately, so sales tax is calculated on the client’s final statement. It also makes life easier at the end of the month when calculating sales tax.
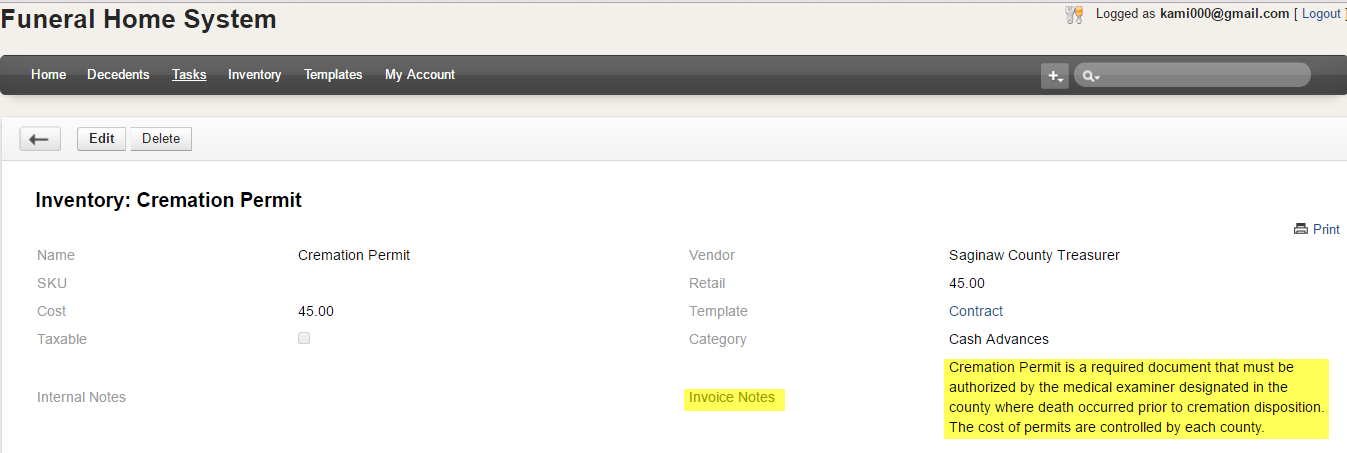
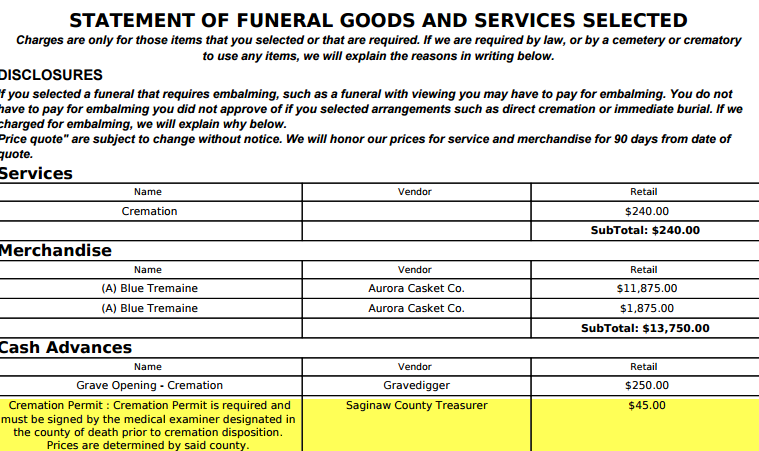
The Invoice Notes at the bottom right hand corner of the Inventory page is a neat option as whatever details are added to the box, a customer will see on their statement. For example, cash advance items, such as cremation permits, obituaries and the like are consumer costs that are established by the entity the funeral home is using for additional services and/or items to complete funeral arrangements for a family. The funeral home has no control over the costs; however, customers don’t know that, and they probably won’t remember it was discussed during the family consultation. Thus, why Invoice Notes is a good option and place to explain specific charges. This eliminates unnecessary stress for the customer and one less phone call the funeral home will later receive. See the first example below, exhibiting notes that were inputted during the adding inventory process. The second snapshot reveals how the notes will appear on the customer’s statement. How easy is that?
Now, that the inventory is all inputted, it’s time to grab a cup of Java because at this point, you deserve it.
Customer Service
Memorial Director currently operates a customer service department where friendly, professional representatives are available to chat and assist funeral homes with the Memorial Director program.